There are hikes that look good on Instagram.
And then there are hikes that make you question your life choices halfway up a volcanic slope while someone behind you mutters,
“We could’ve been at the beach… having a cocktail.”
That was day one of the Acatenango hike.
By that evening, watching lava explode into the night sky from a wooden cabin perched above the clouds, I understood exactly why people do this.
This guide isn’t recycled information from a tour website.
It’s what the hike actually feels like — physically, mentally, socially — and everything I wish I’d known before stepping onto that first steep stretch of volcanic gravel. This guide is more practical than my description in my full page on My Full Guatemala travel guide.
If you’re wondering:
- How hard is the Acatenango hike (and is it worth it)?
-
Is it dangerous?
-
Can beginners do it?
-
Is the Fuego hike worth it?
-
How much does it really cost?
-
Which tour company should you choose?
Let’s get into it.

What is the Acatenango Hike?
The Acatenango hike is a two-day, one-night volcano trek from Antigua, Guatemala.
You hike up Volcán Acatenango and camp near the summit, directly facing Volcán de Fuego — one of the most active volcanoes in Central America.
From basecamp, you can watch Fuego erupt every 15–20 minutes (conditions permitting), with lava and ash lighting up the sky.
There are three possible climbs:
The main ascent to basecamp (mandatory)
The Fuego ridge hike (optional sunset hike)
The Acatenango summit hike (optional sunrise hike)
This flexibility matters — and it’s often overlooked.
You can tailor the difficulty depending on how your body feels.

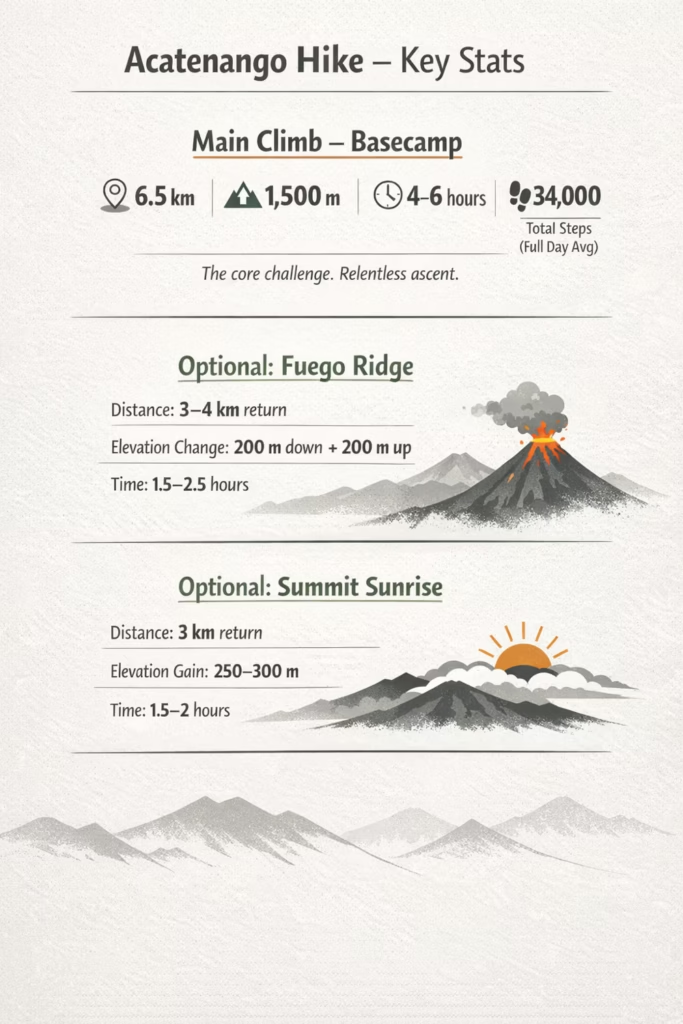
Key Stats
The total distance varies depending on your tour company and whether you complete the optional Fuego Ridge and summit hikes. For a full breakdown, see my guide covering how long the Acatenango hike is, including route variations and hiking times.
Main Climb – Basecamp
- Distance: 6.5 km
Elevation gain: ~1,500 metres
Time: 4–6 hours
Steps: ~34,000 per day total (including optional hikes)
This is the core challenge.
The 34,000 steps includes everything — the main ascent, moving around camp, and the optional hikes. But the bulk of the grind is in that first 6.5 km.
It is relentless.
Optional: Fuego Ridge Hike
Distance: ~3–4 km return
Elevation change: ~200m down to the saddle, then ~200m back up
Time: 1.5–2.5 hours
You descend 200m into the saddle between the two volcanoes, then climb back up the opposing ridge toward Fuego (guides keep you at a safe distance).
I actually found this the easiest hike of the three.
Why?
Because you’ve:
Rested at basecamp.
Eaten.
Recovered slightly.
And the excitement of watching eruptions — for me, the first time in my life — overrides fatigue.
All senses feel heightened.
The ground shakes more.
The sound feels louder.
There are no visual distractions.
Just darkness and fire.
It’s intense in the best way.
Optional: Acatenango Summit (Sunrise)
- Distance: ~3 km return
-
Elevation gain: ~250–300m
-
Time: 1.5–2 hours
This is the steepest section of the entire hike.
The climb from basecamp to the summit is brutal.
My Whoop actually recognised it as a stairmaster workout — not a hike.
Loose volcanic sand.
Steep gradient.
Cold wind.
Pre-dawn darkness.
But the sunrise above the clouds is something else entirely.
One thing I underestimated before the hike was just how much climbing was involved. Acatenango gains more elevation than Ben Nevis, and the actual climbing effort feels even higher once you factor in the Fuego Ridge hike and summit push. I’ve broken down the full Acatenango elevation gain here.
How Hard Is the Acatenango Hike?
Short answer:
It is physically demanding — but not technically difficult.
This is not a technical mountaineering challenge.
There’s no scrambling. No ropes. No exposed ridgelines.
The difficulty is cardiovascular.
It’s your heart and lungs that are tested — not your hiking experience.
What surprised me most was that the distance wasn’t actually the hardest part. The full Acatenango hike distance is manageable for most reasonably fit travellers, but the elevation gain and terrain make it feel much tougher than the numbers suggest.
Where Is It Steepest?
The first section of the mountain is the steepest psychologically.
It’s exposed. It hits quickly. And it sets the tone.
From there, it stays very steep all the way to lunch.
After lunch, the hike transitions slightly — you begin contouring around the mountain toward your specific tour company’s campsite. It’s still effort, but less aggressively vertical.
Then comes the optional summit climb.
That is the steepest section physically.
And you feel it.
If you want a more detailed breakdown of what it actually feels like physically and mentally, I’ve covered that here: how hard the Acatenango hike really is.
The Calf Reality No One Talks About
For me, the hardest part wasn’t my lungs.
It was my calves.

Even the “rest stops” aren’t flat.
You’re standing on an incline.
Your calves stay slightly stretched for prolonged periods.
There’s no real muscular release until you reach basecamp.
When you finally sit properly, boots off, legs flat — the relief is immediate.
It’s a detail I wish someone had told me.
A Technique That Changed Everything (And Saved Energy)
Loose volcanic gravel has a reputation for the “two steps up, one step back” effect.
But watching the guides changed how I climbed.
They don’t just walk.
They subtly kick their foot forward into the gravel until the front of the shoe hits firmer ground beneath. That small forward press creates stability before weight transfers.
It prevents sliding.
It reduces wasted energy.
It keeps momentum steady.
Once I copied that technique — or even stood in their footsteps — the climb felt more controlled.
This is where experience shows.
And it’s why watching your guides matters.
Can a Beginner Do the Acatenango Hike?
Yes — if you are reasonably fit.
No — if you are sedentary.
Again, it’s not technical.
The deciding factor is cardiovascular fitness and muscular endurance.
You do not need hiking experience.
You do need stamina.
And remember:
You can skip the Fuego hike.
You can skip the summit hike.
You can hire a porter (around Q200) to carry your bag.
The hike is adjustable.
That nuance matters.
Is the Acatenango Hike Dangerous?
Short answer:
With a reputable tour company — the risks are manageable.
But let’s break this down properly.
1. Altitude
Acatenango stands at 3,976m.
Some people experience mild altitude symptoms:
Headache
Nausea
Fatigue
On my tour of 30+ people, only a handful experienced symptoms beyond mild discomfort.
Hydration helps.
Pacing helps.
Listening to your body helps.
The effects of altitude are real — but manageable for most.
2. Cold & Wind
It gets cold.
Especially:
At basecamp after effort stops
On the Fuego ridge
On the summit
When strong winds roll through
The effort keeps you warm on ascent.
The moment you stop — you feel it.
Very strong winds can amplify that cold significantly, especially on exposed sections like the Fuego ridge and summit.
The only known deaths on Acatenango occurred in the very early years of tourism, when tours were less experienced and poorly prepared. They were due to hypothermia from inadequate preparation.
Modern reputable tours are vastly better organised.
Preparation is everything.
3. Volcanic Activity (Fuego)
Guides are not allowed to take tourists too close to Fuego.
There is a strict safe distance maintained.
Conditions can change quickly, and guides monitor activity constantly.
You are close enough to feel the power.
Not close enough to be reckless.
4. Loose Terrain
Yes, you will slide occasionally.
But technique matters.
Watch the guides.
Copy their foot placement.
Kick into gravel before stepping.
Stand in established footsteps where possible.
This mitigates wasted energy and increases stability.
5. Group Structure & Professionalism
On my hike, no one was allowed to split off.
For safety, everyone stayed together.
No man left behind.
Pace adjusted.
Breaks synchronised.
Communication clear.
I even heard stories from other travellers about tours where hikers had to wake their guides for the sunrise hike.
That was not the case with OX Expeditions.
Wake-up times were communicated the night before.
Hike departure times were adhered to.
Everyone who wanted to summit was woken.
Professionalism matters more than saving $20.

What to Pack for the Acatenango Hike
Everything you bring should fit into a 40–60L backpack.
If it doesn’t fit comfortably in that range, you’re probably overpacking.
And remember — you’re carrying this up 1,500m of elevation.
Weight matters.
Strategy matters even more.

Layers: The Most Important Decision You’ll Make
Minimum:
T-shirt (base layer)
2 mid-layers (minimum)
Thick insulated jacket
Waterproof / windproof outer layer
Some people wore more than I did.
Thin thermals were common.
On the Fuego ridge I wore:
T-shirt
Two jumpers
Thick coat
And I was still grateful for every layer.
Important nuance:
The ascent itself isn’t “warm.”
It’s the effort that keeps you warm.
The second you stop — at breaks, at basecamp, on the summit, or on the Fuego ridge — the cold hits properly.
Wind makes this even more intense.
Layering isn’t optional. It’s survival comfort.
Essentials (Not Optional)
- Headlamp
Extra socks
Sunscreen
Hat / beanie
Gloves
Toilet paper
Hand sanitiser
The headlamp isn’t just for summit hikes.
Toilets are not always lit.
They are not always close to your tent.
Keep your headlamp within reach at night.
Trust me on this.
Liquids
Minimum: 4 litres
Some people bring only water.
Some bring sports drinks or electrolyte mixes.
The price difference only varies because of what you choose.
Hydration is non-negotiable.
Snacks (Not Provided)
You need roughly:
1,000–1,500 calories
Budget: $5–10
Think:
High calorie
Easily digestible
Won’t get crushed
Bananas sound like a great idea.
Until they’ve been compressed into your warm jumper.
There is one small shop at the lunch stop selling extra snacks — but prices are higher.
Plan ahead.
Community Food Contribution
You’ll carry your contribution for group lunch/dinner.
Keep an eye on whoever is assigned chocolate.
We had a thief in our group.
No chocolate treat after dinner.
Still unresolved.
The Dogs
There are dogs that hike the mountain with groups.
They may look far away.
They are not.
The second you crack open a water bottle, those puppy eyes appear.
Pack a little extra water if you’re soft-hearted.

Packing Strategy (This Matters)
Most of the hike I wore:
Shorts
T-shirt
Which meant:
Warm layers needed to be right at the top of my bag
Snacks needed to be in side pockets
Headlamp easily accessible
Gloves not buried
If you reach a windy exposed section and your coat is buried at the bottom, you’ll regret it immediately.
Pack for access — not aesthetics.
Smaller Bag for Optional Hikes
Once you reach basecamp:
You’ll drink water
Eat snacks
Hand over your community food
For the Fuego and summit hikes, you don’t need your full pack.
A smaller daypack (or partially emptied bag) is far more comfortable than carrying a half-empty 50L monster.
Ask your tour if they provide a smaller bag option.
What Can You Rent?
This links directly into choosing your tour company.
Some companies include rentals.
Some charge extra.
Some don’t offer certain items at all.
With OX Expeditions (my experience):
Included free:
Large backpack
Warm jackets
Jumpers
Beanies
Gloves
Extra cost:
Hiking poles (~$5)
Not included / not offered:
Hiking boots
Boots can be rented from shops in Antigua.
Typical rental cost: $5–10 per day, depending on quality.
Important grounding:
Sleeping bags are almost always kept at basecamp.
You carry a liner, not the full bag.
And most people sleep in what they hiked in.
There are no showers.
Very few people change clothes.
Besides me, almost no one brought separate sleeping outfits.
This is not a hike where anyone smells or looks their best.
And that’s part of it.
Should You Rent Poles?
I didn’t.
But there are sections where the added stability could be very useful — especially on the descent and loose terrain.
If you’re inexperienced or unsure on steep declines, $5 is cheap insurance.
Small Hint Before the Next Section
When planning your trip, consider:
What warm layers can you rent instead of buying?
What does your tour include?
Is rental free or extra?
What quality are they providing?
This becomes important when comparing tour companies.
Which brings us to the next decision.
Choosing the Right Acatenango Tour Company
I’ve only hiked Acatenango once.
So I can’t compare five different companies side by side.
But I can tell you what made my experience smooth — and what I learned from other travellers who didn’t have the same level of organisation.
I went with OX Expeditions.
This is not sponsored.
Just experience.
And the differences between companies are bigger than people realise.
1. Pre-Tour Communication (Underrated but Crucial)
Some companies respond to WhatsApp messages with one-word answers.
Others send full breakdowns before you even ask.
With OX, we received:
A detailed PDF covering gear, route, expectations, timing.
Clear confirmation of what was included vs extra.
An optional in-person briefing the night before.
At the briefing they:
Showed examples of clothing.
Explained what could be rented.
Clarified what we’d carry.
Set expectations properly.
That level of communication reduces anxiety massively.
It also signals professionalism.
If a company struggles to answer basic questions before you’ve paid — that’s information.

2. Food (Massively Variable)
This surprised me.
After the hike, I spoke to multiple travellers who used different companies.
The variation in food was huge.
Some received:
Proper hot meals.
Solid portion sizes.
Vegetarian options.
Snacks.
Others received:
Very basic servings.
Smaller portions.
Limited dietary flexibility.
You will be burning thousands of calories.
Ask:
What meals are included?
How substantial are they?
Are snacks provided?
What dietary options exist?
And maybe — just maybe — confirm how chocolate distribution is handled.
3. Rental Gear: What’s Included vs Extra?
This is where costs quietly creep up.
With OX:
Included (free):
Backpack
Warm jacket
Jumpers
Beanie
Gloves
Extra:
Poles (~$5)
Not offered:
Hiking boots
Boots can be rented in Antigua for roughly $5–10 per day.
Other companies:
May charge for jackets.
May charge for backpacks.
May charge for gloves.
May charge for everything.
Clarify this upfront.
A “cheap” tour that adds $20 in rentals isn’t cheaper anymore.
4. Campsite Location & View (Huge)
This is rarely mentioned.
Different companies have different campsites.
Some have a better direct view of Fuego than others.
From our cabin, we could see Fuego erupting clearly from basecamp.
In fact, we saw more eruptions from camp than on the Fuego ridge hike itself — simply because our angle was so good.
That matters.
If your camp has a blocked or side-on view, your experience changes.
Ask:
Where is your campsite located?
Can you see Fuego clearly from camp?
It’s a small question.
Big impact.

5. Professionalism & Structure
This is the one people underestimate.
I heard from other hikers about tours where:
Wake-up times were unclear.
Guides were disorganised.
Some hikers had to wake their guides for sunrise.
With OX:
Wake-up times were communicated clearly the night before.
Departure times were adhered to.
Everyone who wanted to summit was woken.
The group stayed together for safety.
No one was left behind.
We didn’t split by pace.
It was one group.
Controlled.
Structured.
On a mountain at 3,900m, structure is comforting.
6. Group Dynamic
You’re spending 24+ hours with these people.
Strangers at first.
By dinner?
You’re laughing about how you could’ve been at the beach with a cocktail instead of climbing a volcano.
Shared suffering removes small talk.
No phones.
No signal.
No distractions.
Just effort, jokes, encouragement, and the occasional accusation of chocolate theft.
That dynamic is shaped by the guide.
Energy flows from the top.
How Much Does the Acatenango Hike Cost?
Let’s break this down properly.
Because the headline price is rarely the final number.
1. Tour Cost
Most organised overnight tours range:
$75 – $165 USD
Budget operators: ~$75–90
Mid-range: ~$100–130
Higher-end (like Wicho & Charlie’s 4-person cabin): ~$165
You don’t need to pay the highest price.
But don’t blindly choose the cheapest either.
2. Park Entrance Fee (Often Not Included)
Q100 (approx $13 USD)
Paid in cash.
Usually at two separate checkpoints on the mountain.
Many tours do not include this in the headline price.
Ask before booking.
3. Fuego Hike Add-On (Optional)
Usually: $20–25 USD
Sometimes paid:
On the mountain
Or back at the tour office after returning
The sunrise summit hike is typically included.
The Fuego hike often isn’t.
4. Gear Rental
If not included:
Jacket: $5–10
Backpack: $5–10
Gloves / hat: $2–5
Poles: ~$5
Hiking boots (from Antigua shops): $5–10 per day
This can add up quickly if not clarified beforehand.
5. Snacks & Liquids
4 litres of liquids
1,000–1,500 calories of snacks
Budget: $5–10 USD
There is one shop at the lunch stop — but prices are higher.
6. Toiletries & Extras
Toilet paper & hand sanitiser: $2–4
Altitude sickness tablets (precaution): $5–15
7. Optional Porter
Around Q200 (~$25 USD)
If you’re worried about carrying weight, this can make a big difference.
Realistic Total Range
Budget end (bare minimum): ~$110–130
Mid-range experience: ~$150–190
Still exceptional value for what you experience
The hike is one of the most expensive experiences in Guatemala — I break down how it fits into your overall Guatemala travel cost here.
Best Time to Hike Acatenango
Most travellers hike Acatenango shortly after arriving in Antigua.
If you’re building your trip around this experience, here’s where Acatenango fits in a 2 week Guatemala itinerary and how to plan the days around it.
And if you’re here during the popular travel window, you’re probably already in dry season.
Dry season in Guatemala runs roughly:
November – April
Clearer skies. Better volcano visibility. Lower rainfall.
Rainy season (May – October) can still be hiked — but cloud cover increases.
Niche tip from a guide:
The very start and end of rainy season can be the best time to witness lightning striking Fuego.
Not official science. Just local knowledge.
But imagine that visual.

Acatenango Hike FAQ
The practical questions matter.
But the answers are rarely just practical.
How Cold Is Acatenango?
Cold enough that you’ll be grateful for every layer you packed.
At basecamp, once the effort stops and your body cools down, the temperature drops fast. Overnight it often sits close to freezing.
On exposed sections — especially the Fuego ridge and the Acatenango summit — very strong winds can roll through and make it feel significantly colder than the actual temperature.
It’s not just the number on a forecast.
It’s the wind, the altitude, and the fact you’re already tired.
Most people slept in almost exactly what they hiked in.
No showers.
No outfit changes.
Few people (besides me) brought separate sleep clothes.
You’re not there to look good.
You’re there to experience something.
Layers matter more than aesthetics.
Do You Need to Be Fit?
You need to be reasonably fit.
You do not need to be an athlete.
This hike rewards pacing and stubbornness more than speed.
And remember:
You can hire a porter (~Q200) to carry your bag.
You can skip the Fuego hike.
You can skip the summit.
You can turn back if needed.
It is not all-or-nothing.
That flexibility is why many first-time hikers complete it successfully.
Is the Fuego Hike Worth It?
For me?
It was the best part.
And that surprised me.
The summit sunrise is beautiful.
The basecamp eruptions are dramatic.
But the Fuego hike feels different.
It’s dark.
You descend into the saddle.
You climb toward a living volcano.
There are no visual distractions.
Your senses feel heightened.
The ground shakes more.
The explosions sound louder.
Your legs ache from the extra effort.
And that ache makes the reward sharper.
It’s that extra work–reward ratio that makes it hit harder.
Objectively, yes — the photo opportunities can be incredible if conditions align. Some people capture insane eruption shots from the ridge.
Even though my personal photos weren’t the viral postcard kind, the feeling of being there outweighs the image.
It felt raw.
Can You Hike Acatenango Without a Tour?
Technically, yes.
Should you?
No.
There are multiple checkpoints.
Park fees are collected on the mountain.
Weather can shift quickly.
Navigation in poor visibility would be dangerous.
And the altitude and cold demand structure.
Guides know pacing.
They know when to push and when to pause.
They know where to stand safely on the Fuego ridge.
For the small cost difference, a reputable tour is worth it.
Is It Worth It If Fuego Doesn’t Erupt?
It is highly likely that it will.
Fuego has been erupting consistently for several years.
But even if you hit a quieter window — you’re still:
Sleeping above the clouds.
Watching the sky turn from black to orange at 3,900m.
Sharing a mountain with strangers who don’t feel like strangers anymore.
The experience isn’t dependent on one eruption.
It’s built from the effort.
Is the Acatenango Hike Worth It?
There’s a moment on day one.
Your legs are heavy.
Your calves are burning.
Your breathing is loud in your own ears.
Someone behind you laughs and says,
“We could’ve been at the beach… having a cocktail.”

And for a second, you agree.
You question why you signed up.
Why you’re voluntarily climbing a volcano instead of sitting somewhere flat and comfortable.
But something happens up there.
The signal disappears.
Phones go quiet.
Strangers start encouraging each other.
Conversations shift.
There’s something about a shared uphill struggle that strips away surface-level interaction.
No one cares what you do for work.
No one is checking Instagram.
No one is distracted.
It’s just effort.
And that effort creates connection.
Every challenge is followed by reward:
The first cloud break.
The first eruption.
The first time you sit down properly at basecamp and feel your legs go still.
The first sunrise light above the clouds.
Effort.
Reward.
Effort.
Reward.
It becomes addictive.
And it’s unique.
How often are you going to:
-
Stand within safe distance of an actively erupting volcano?
-
Sleep nearly 4,000m above sea level?
-
Watch lava light up the sky?
-
Share that with 20 strangers who now feel like teammates?
Not often.
That’s what makes it worth it.
Not just the photos.
Not just the volcano.
The cycle.
The discomfort.
The laughter.
The shared disbelief.
The moment you look around and think —
I’m really here.
And we chose this.
Undoubtibly one of the highlights of my full Guatemala trip